Changing Setup and Calibration Numbers in a Digi-Star Indicator
Changing Setup and Calibration Numbers in a Digi-Star Indicator
1. Hold the ZERO button and the ON button until "SETUP" is shown on the screen.
2. After "SETUP" the indicator will display its current setup number with the last digit flashing.
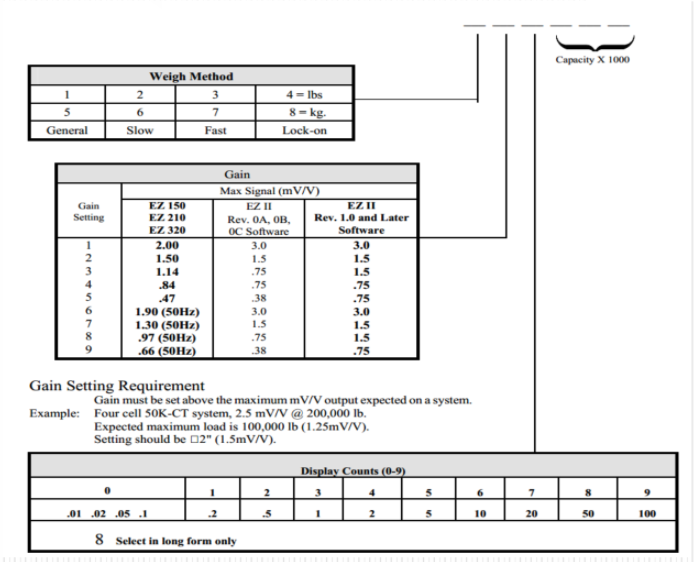
A good number for most load bars would be:
Grain Cart - 1 General weigh method in lbs
2 Gain setting covers most load bars
7 Display in 20# increments
0 The last three numbers is the total max capacity of your cart ex. A cart that
7 holds 1000bu take 1000x 70lb/bu = 70,000 so your setup number would be =127070
0
Planter - The Third number would be a 5 to measure in 5# increments or 6 for 10# use the same formula to figure out the last Three numbers
Feed Wagon/ Truck - The Third number would be either 5 to measure 5# increments or 6 for 10# use the same formula to figure out the last Three numbers
3. Enter the new setup number. Use the button with an upward pointing arrow to increase the flashing digit. Use the button with a sideways pointing arrow to move to the left one digit. If your indicator has a number pad, the new number can be typed directly instead of using the arrow keys.
4. Press the ON button to save the new setup number and advance to the calibration number. "CAL" will be shown on the screen.
5. After "CAL" the indicator will display its current calibration number with the last digit flashing.
To correctly figure out what your calibration needs to be
Place a known (certified) weight of at least 1000# on scale
Write down what the indicator says
Use the number from for current Calibration number in this formula:
Correct Weight Current Calibration New Calibration
—------------------- X Number = Number
Incorrect Weight
(Indicator Weight)
6. Enter the new calibration number. Use the button with an upward pointing arrow to increase the flashing digit. Use the button with a sideways pointing arrow to move to the left one digit. If your indicator has a number pad, the new number can be typed directly instead of using the arrow keys.
7. Press the ON button once to save the calibration number and return to weigh mode.
Related Articles
Avery Weigh-Tronix Load Cell Calibration Numbers
The reading @ 0.4mV/V can be used as the Calibration number for a Digi-star indicator, or the Custom number on a Weigh-tronix indicator.GT400 and UNVERFERTH 410 Calibration
GT400 and Unverferth 410 Calibration VideoEZ150, EZ210 and EZ350 Setup and Calibration
Avery Weigh-Tronix 1040 Indicator calibration
Push and hold the MENU key until it says “SETPAS”. (*Note: If the indicator just sits there and beeps after 3-4 seconds, let go of the MENU key, at that point “SETPAS” should appear) Type 1040 Once “1040” is on the screen press SELECT. (*At this ...Avery Weigh-Tronix 640 Indicator Calibration
Watch this video to calibrate your indicator. Press and hold the "Hold/Menu" button for three beeps then release. Enter "640". Use "RM" to increase the displayed value and "M+" to decrease it. Press the "Hold/Menu" button to move one digit to the ...